If you’re running a service-based business, chances are you didn’t sign up for endless email chains, scattered info, or chasing down clients for the third time about their budget.
You’re here to do great work. But before you can do that, you need the right info. At the right time. From the right people.
That’s where a solid client intake form comes in.
But forms these days? They can do more than just collect info. The best ones don’t just sit there — they work. They tag submissions, assign follow-ups, organize details, and kick off your next steps without you having to lift a finger.
Basically, your intake form should be pulling its weight—and then some.
Let’s break down how to build one that actually helps you work smarter, not harder.
The following guide will teach you how to create a client intake form that prospects and clients will be happy to fill out, and that’ll make your life much easier.
- Step 1: Choose a client intake form tool
- Step 2: Decide when you need to use it
- Step 3: Ask the right questions
- Step 4: Add other elements to your form
- Step 5: Share the client intake form
What is a client intake form?
A client intake form is your behind-the-scenes superpower. It helps you get all the info you need before the work begins—so you’re not chasing down timelines, second-guessing budgets, or piecing together project details from scattered emails.
It’s your way of asking the right questions up front: Who are you? What do you need help with? When are you hoping to get started? And most importantly—are we the right fit for each other?
But here’s the thing: intake forms aren’t just about collecting info anymore.
These days, the best ones are built to do more. You can:
-
Automatically tag submissions so you know what kind of lead just came in
-
Trigger follow-up tasks without lifting a finger
-
Filter and sort responses so nothing gets lost in the shuffle
-
Limit who can create and manage forms, keeping everything clean and consistent
In other words? A great intake form doesn’t just start the conversation—it sets your whole process in motion.
Why you (and your clients) need an intake form
It might seem like a simple tool, but a thoughtfully built client intake form can have a major impact on how you run your business. Here’s what it helps you do:
-
Save time by asking once. Set your questions up front so you’re not repeating yourself with every new lead.
-
Make a strong first impression. A clean, organized form shows clients that you’re prepared and professional.
-
Qualify leads early. The right questions help you quickly spot who’s a good fit—and who isn’t.
-
Help clients clarify their goals. Intake forms prompt clients to think through what they actually need before work begins.
-
Speed up proposal writing. With clear answers in hand, creating contracts and proposals becomes much faster.
-
Keep records automatically. When connected to your CRM, the form does the data entry for you—no extra steps needed.
-
Go into meetings prepared. Skip the backtracking and start every conversation with the context already in place.
-
Collect everything you need upfront. From logins to logos, you won’t need to chase down missing materials later.
-
Move deals forward faster. Less admin time means clients get through your pipeline more smoothly.
-
Spot trends and improve. Over time, responses can highlight patterns that help you refine your services or processes.
It’s a small shift — but once you have a smart intake form in place, you’ll wonder how you ever worked without it.
How to create a client intake form template for your business
The questions you ask—and even the type of form you use—will depend a lot on what kind of work you do. A real estate agent’s intake form won’t look the same as a branding agency’s, and that’s exactly how it should be.
But no matter your industry, there are five key steps that go into creating a form that actually works for you (instead of just collecting dust). Let’s walk through them.
Step 1: Choose a client intake form tool
There are a number of tools you could use to create your client intake form.
Pro tip: Make sure you find one that is cost-effective, easy to use, and integrates with your other business software.
Google Forms
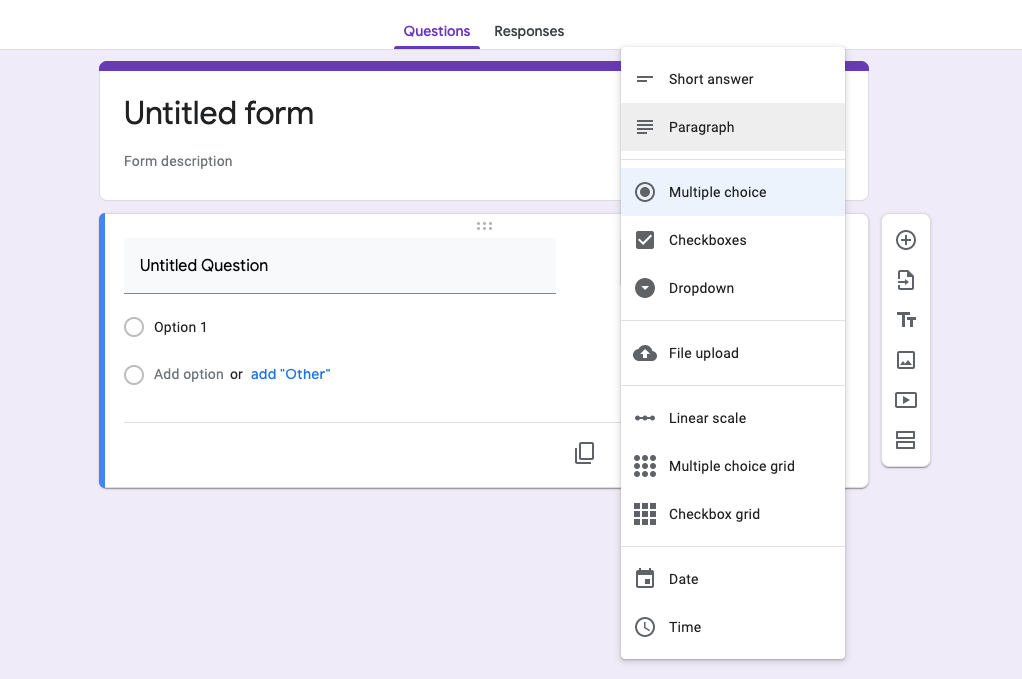
Google Forms is free, easy to use, and can be managed alongside your other Google Drive business documents.
From this screen, you can:
- Create a name and add instructions to the top of the form.
- Add a logo or company image.
- Change the colors and fonts.
- Add different types of questions: open-ended, multiple choice, checkboxes, date or time selection, file upload, etc.
- Set questions as “Required”.
- Add individual instructions to questions.
- Add a video or a screenshot.
- Organize the form into sections, which is useful if you have a longer form.
If you’re a Copper user, you’ll have the added benefit of integrating the form with your CRM. All you’ll need is a Zapier account to set this up.
Instructions to connect your Google form to Copper are here.
Copper
If you’re already managing your client relationships in a CRM, why not have your intake forms live there too?
Copper Forms makes that possible. It’s a built-in form builder that lets you collect info from prospects right on your website—and then instantly puts that data to work. No messy integrations. No jumping between tools. Just a smooth handoff from form submission to follow-up.
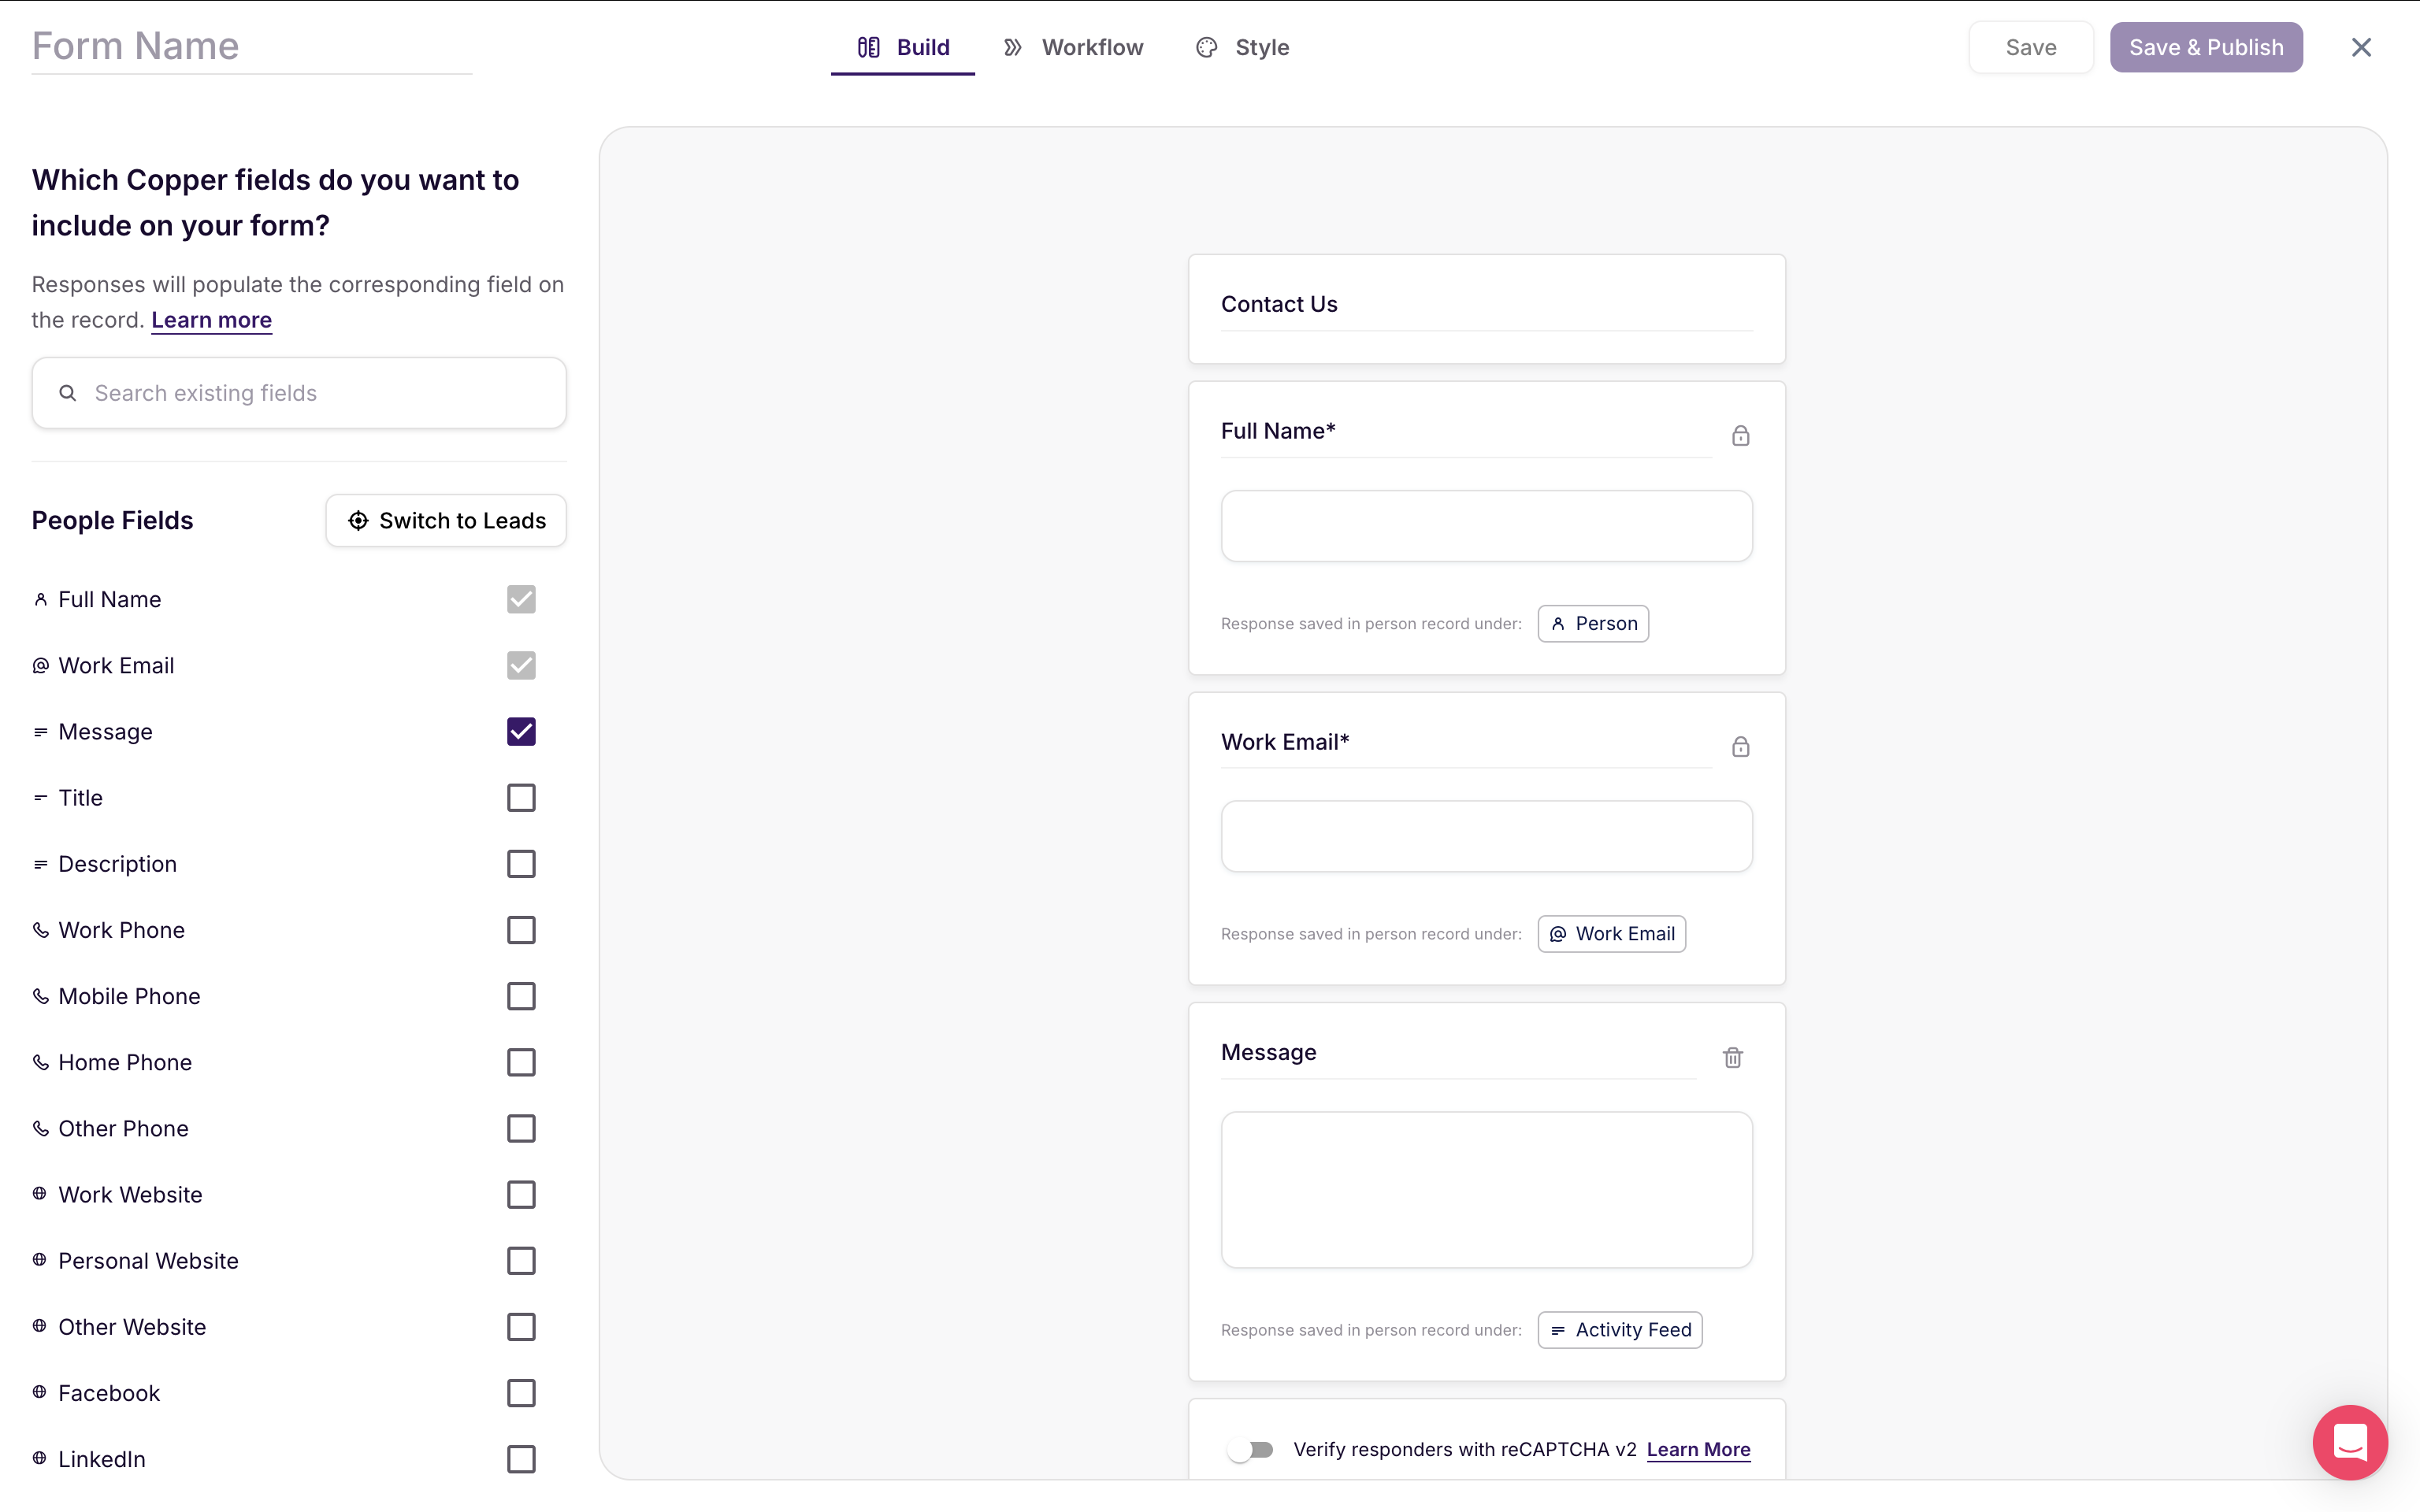
Here’s what you can expect:
-
Custom fields that speak your language. Add the questions you actually care about, relabel them to match your tone, and rearrange things to make the form feel like you.
Automatic next steps. When someone fills out your form, you can automatically tag them, assign a contact owner, and even trigger a follow-up task—so nothing falls through the cracks.
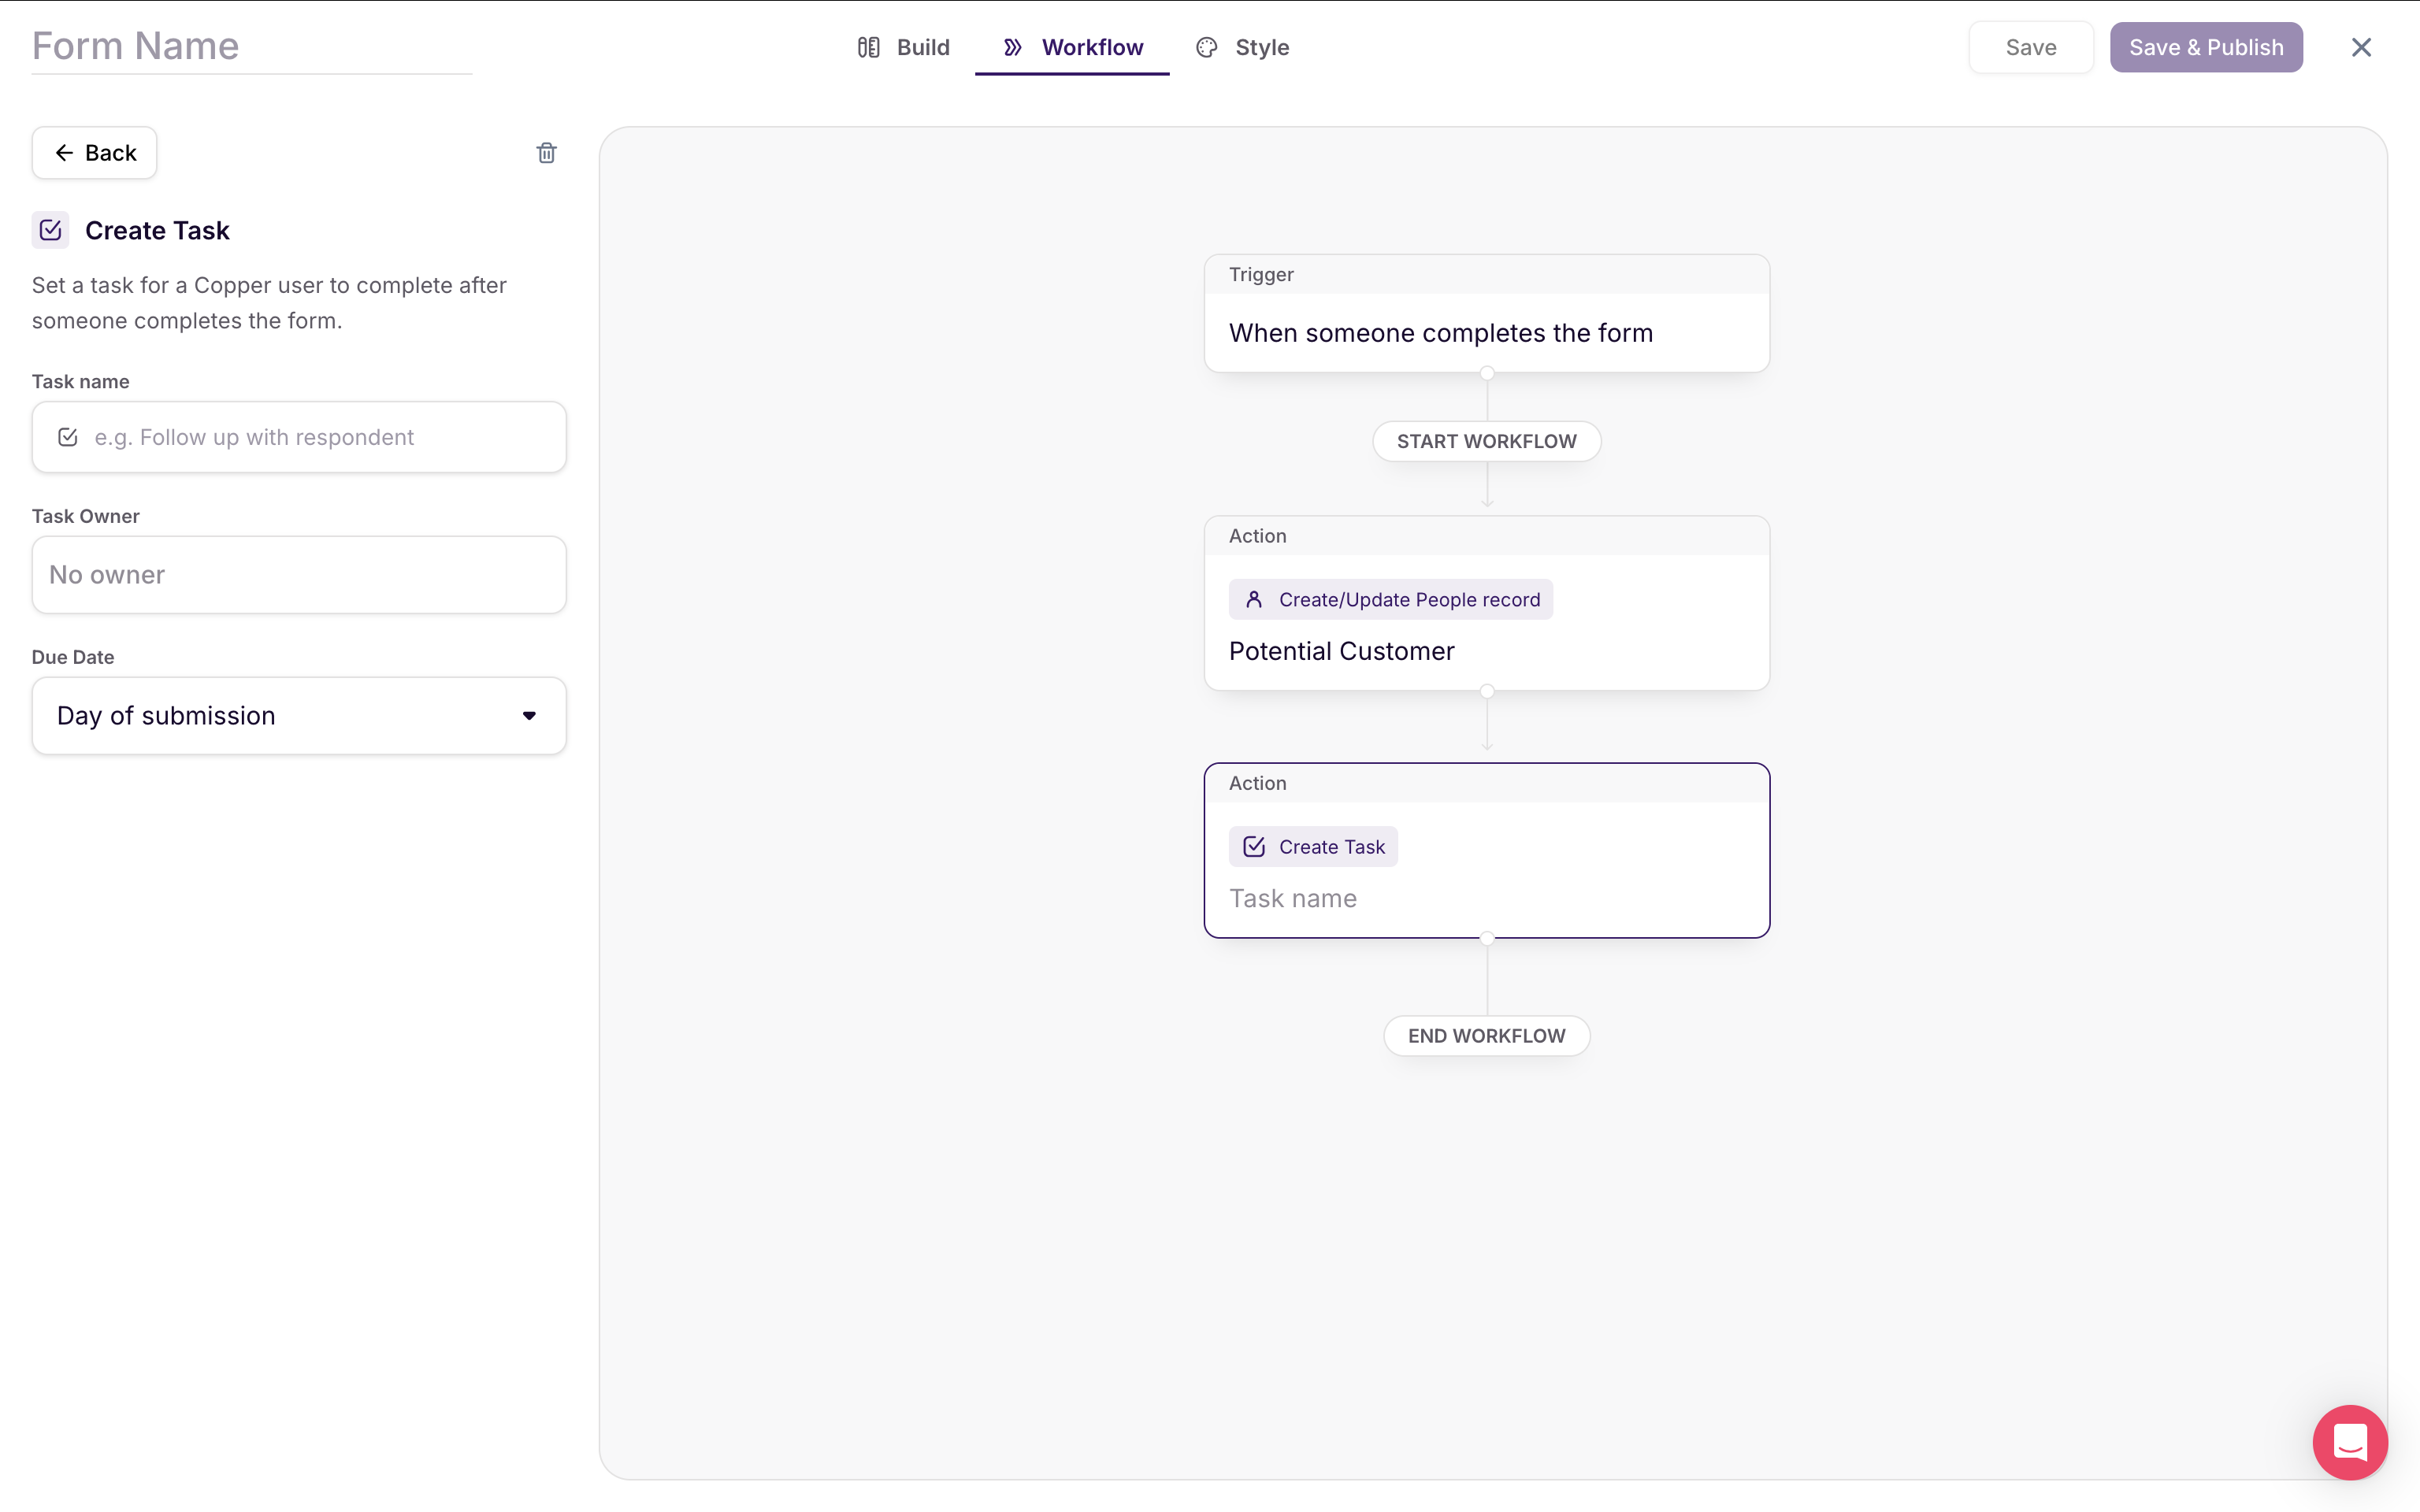
-
Smart syncing. New responses create or update People records based on their email, so your CRM stays clean and organized without any manual work.
-
Brand-friendly design. Choose your fonts, tweak the button colors, and use the eyedropper tool to match your form to your website perfectly.
-
Flexible sharing options. Drop it in as a widget, embed it on a page, or send it as a link in an email.
Every form you create also comes with a saved filter and activity type in Copper, automatically. So tracking submissions? It's taken care of.
If you’re looking for a form that does more than just sit there — one that actually helps you move leads forward — this is it.
Wufoo
If your business is brand new and you’re looking for a flexible form manager tool that can scale with your business, Wufoo would be a good option.
This is what Wufoo’s simple form builder looks like:
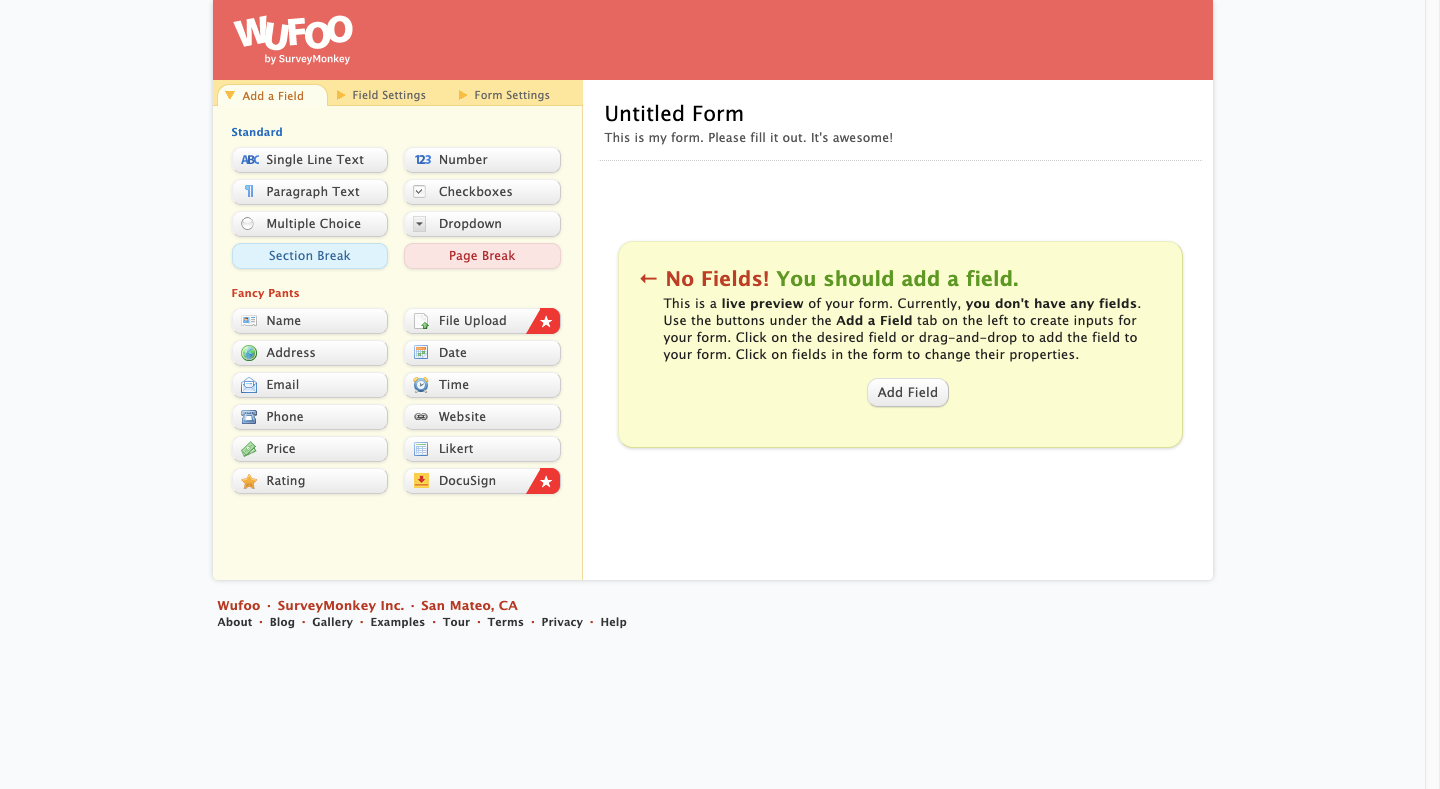
Only one question is displayed at a time and, generally, the questions are formatted in a more casual tone:All you need to do is select the fields you want to add, customize the settings, and then drag-and-drop them into the order you want them to appear.
With Wufoo, you can:
- Edit various parts of the form: name, type, size, required, placeholder text, etc.
- Add preformatted fields (like email or phone number) that force clients to input the right type of response.
- Enter predefined values to save clients from typing out the most common response for that field.
- Redirect users who’ve successfully filled out a form to a specific page.
- Use conditional logic so that the form displays certain fields based on responses given.
Just like Google Forms, you can integrate your Wufoo form with Copper.
Typeform
The forms you create with Typeform are conversational, which means they look like this:
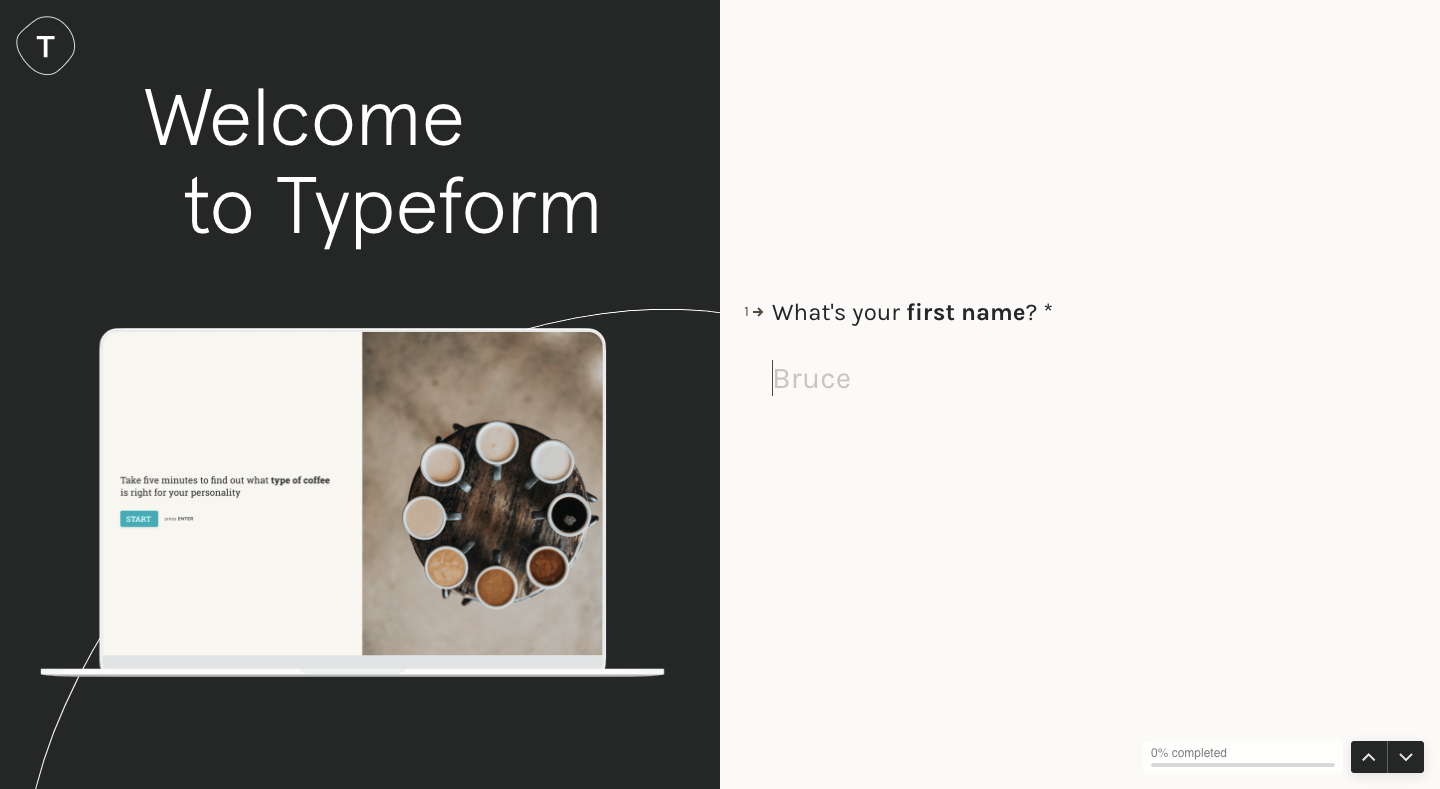
Only one question is displayed at a time and, generally, the questions are formatted in a more casual tone:
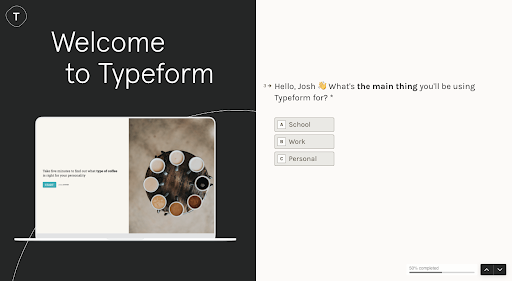
This design is meant to make the form feel more like a person-to-person conversation and much more convenient than filling out a traditional form.
Below is what the Typeform builder looks like. You can add the usual fields as well as additional elements like:
- A Welcome Screen image and message
- A Thank You Screen to display after the form submission
- A legal checkbox for GDPR compliance
- Payment fields (if accepting retainer fees or down payments ahead of time)
- And more
If you’re giving this option some consideration, take note that Typeform also integrates with Copper through Zapier.
Step 2: Decide when you need to use it
A client intake form is useful in two situations. Before you do anything else, figure out if you need one or both of these forms:
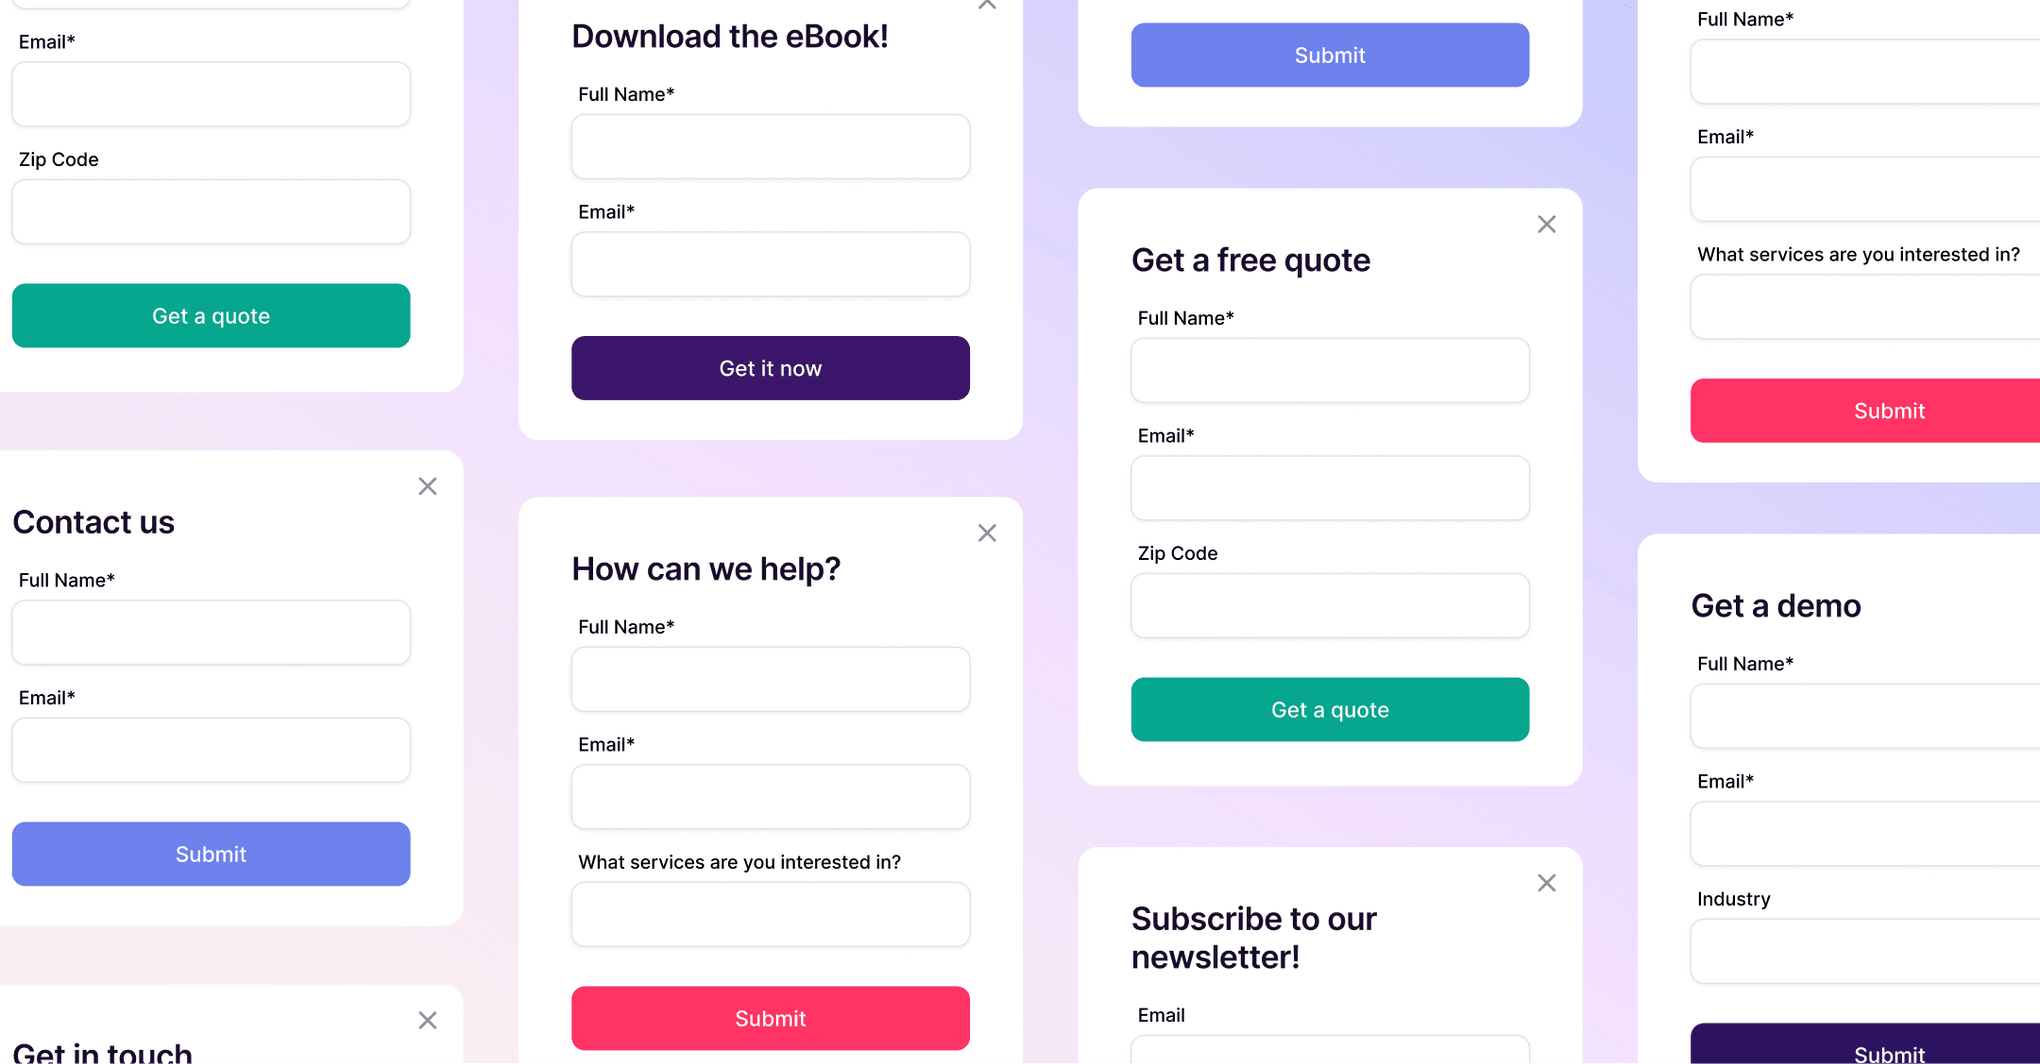
Use a client intake form for prospecting
Not every inquiry is ready for a call—and that’s okay. A prospect client intake form helps you ask the right questions up front so you can figure out who’s a great fit, who needs more nurturing, and what next step makes the most sense.
You don’t need a long form here. A few intentional questions can go a long way:
-
What services are you interested in?
-
What’s your ideal timeline or budget?
-
How can we be most helpful?
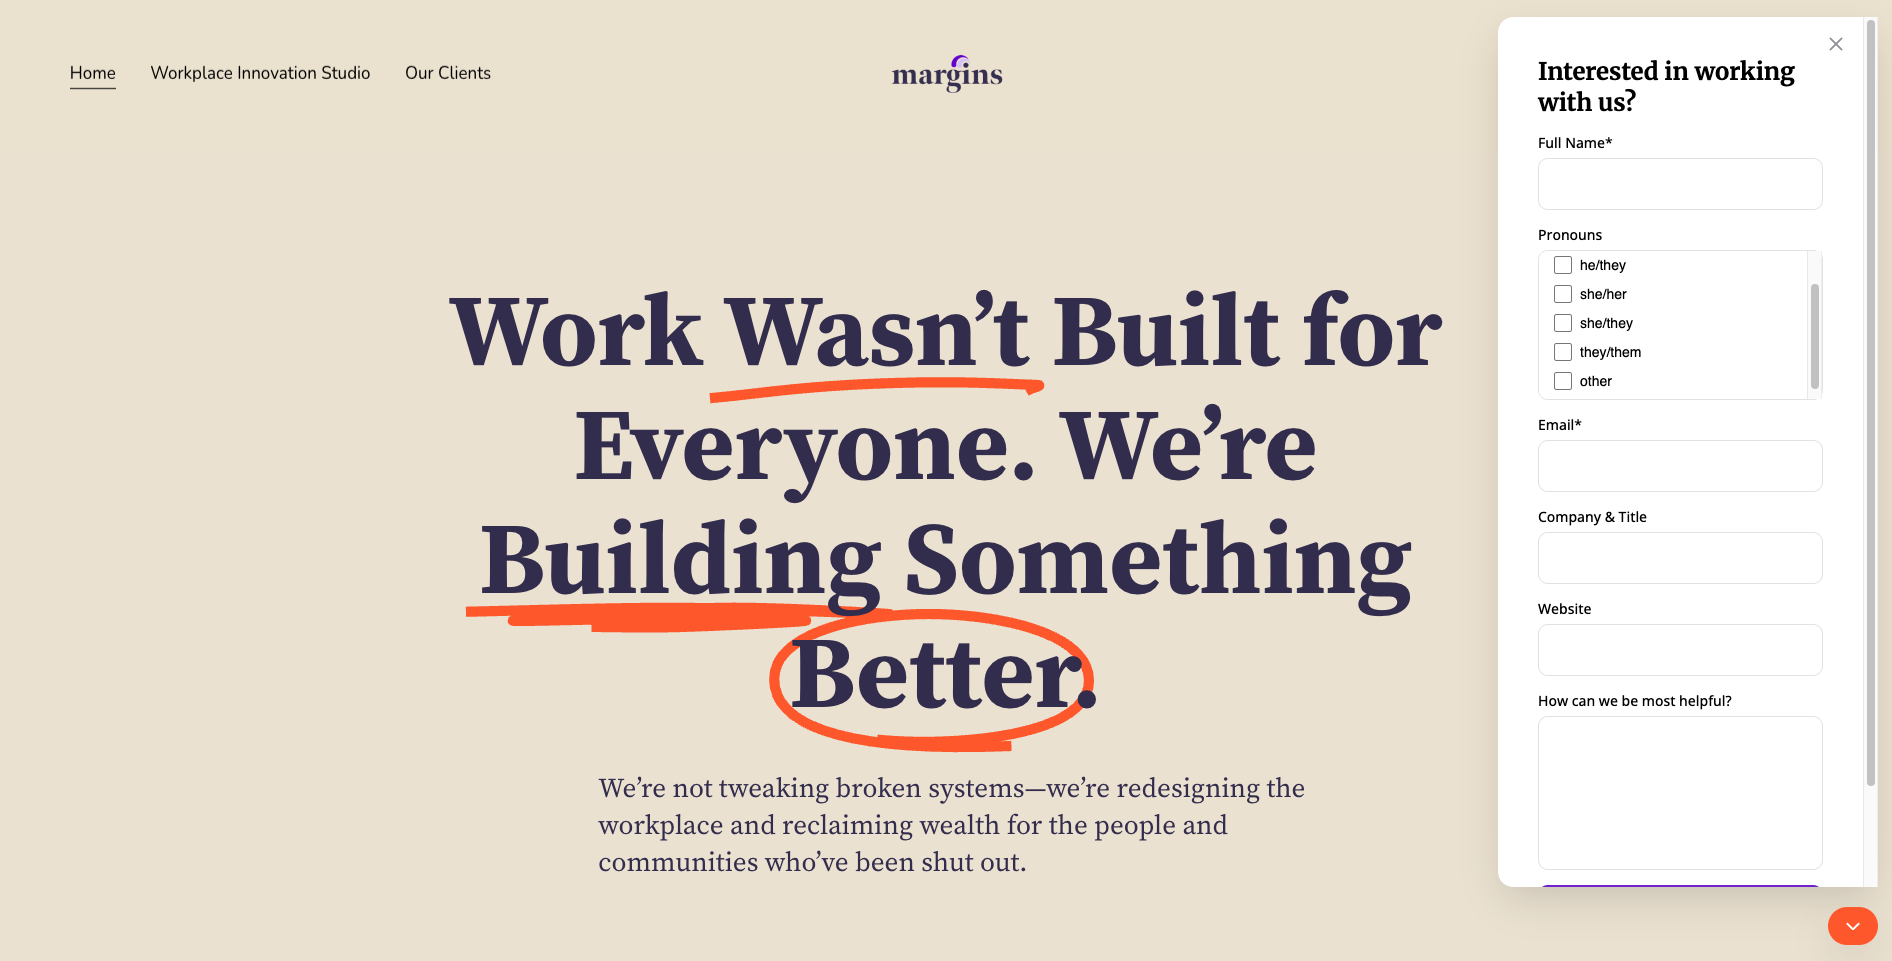
You can also add pronouns or job titles to personalize future conversations — just like Margins Studio does. On their website, a sleek contact form pops up in the lower right corner, making it easy for visitors to reach out without ever leaving the page. It’s thoughtful, unobtrusive, and designed for conversion.
With the right setup, you can automate what happens next:
-
Tag the submission as a lead
-
Assign a task for follow-up
-
Send an automated email to acknowledge the inquiry
A form like this helps you spend less time qualifying and more time connecting — with the people who are actually ready to work with you.
This is the same exact form as before. However, interested clients can fill out what they’re looking for, saving both them and the business time in the follow-up email, call, or visit.
Use a client intake form for client onboarding
Once someone signs on, the real work begins. But before you jump in, you’ll need a few important details to set the project up for success. That’s where your onboarding client intake form comes in.
This version of the form is meant to go deeper. You’re not just collecting contact info—you’re setting the foundation for a smooth working relationship. Depending on your business, that could include:
-
Brand assets or design files
-
Login credentials for tools or platforms
-
Goals, challenges, and key project details
-
Team contacts, timelines, or style preferences
With automation in place, each form submission can automatically update their record in your CRM, tag the client as "Onboarding," and assign a task to prep for kickoff.
The onboarding client intake form isn’t just about gathering information from clients — it’s about starting the partnership on the right foot, with clarity and confidence.
Step 3: Ask the right questions
The magic of a great client intake form isn’t just in how it looks—it’s in what you ask. Your questions set the tone for the entire client experience, so they should feel intentional, clear, and tailored to the kind of work you do.
Let’s break it down.
Appointment-based service providers
If your business runs on booked appointments—think clinics, salons, real estate, legal services—you don’t need to overcomplicate things. A short and sweet client intake form is your best friend.
Stick to the essentials:
-
What service are you looking for?
-
Have we worked together before?
-
Any preferences, needs, or must-knows?
-
When are you hoping to book?
Keep your questions easy to answer. Multiple choice, dropdowns, and checkboxes are your best tools here. You’ll be able to prep ahead, avoid any last-minute surprises, and give your clients a smoother, faster experience from the moment they hit submit.
Project-based service providers
If you work on longer-term projects—like branding, marketing, consulting, or development—you’ll probably need two separate forms: one for prospects, and one for onboarding.
A prospect client intake form is all about getting to know the lead. Keep it light, but insightful:
-
What kind of project are you starting?
-
What goals are you trying to hit?
-
What’s your timeline and budget?
-
What kind of support are you looking for?
This is your chance to qualify leads, understand their needs, and make sure you’re the right fit for each other.
Once the contract’s signed, your onboarding client intake form should go deeper. This is where you gather everything you need to hit the ground running:
-
Who’s the main point of contact?
-
What assets, logins, or links do you need from them?
-
What does “done” look like for them?
-
Are there key dates or deadlines to keep in mind?
If your form has multiple sections, add a progress bar so clients know what to expect. A little clarity goes a long way in keeping people engaged through the end.
When you ask the right questions at the right time, your entire process becomes easier—for you and your clients.
Step 4: Add other elements to your form
Once your questions are set, don’t forget to polish the experience. A client intake form might be the first real interaction someone has with your business—so it should reflect your brand, your tone, and your thoughtfulness.
Here’s what to include to make your form feel like an extension of you:
-
Add your logo and a splash of brand color. It makes the form feel like it belongs to your business, not some random tool.
-
Write a short intro that sets expectations. What’s this form for? How long will it take? Why are you asking these questions?
-
Tell them what happens next. Will they get an email confirmation? Will someone follow up? People like to know where things are going.
-
Include contact info at the bottom, just in case they have questions. A little support goes a long way.
-
Keep the layout clean and the tone consistent. Don’t overdo the instructions or clutter the page—this is about making things easy, not overwhelming.
With a few thoughtful tweaks, your client intake form can do more than just collect information—it can start building trust before you even meet.
What’s nice about this option is you have some flexibility in how you share the appointment scheduler and client intake form. You can embed it on your website or send a link directly to clients.
Include a link in your email signature
Whether you’re reaching out to cold leads or following up with warm ones, it would be great to add a line in the signature of your email that enables them to shortcut the process.
Open your Settings and add the line to your default Signature:
Whenever you create a new email, it’ll automatically be included at the bottom:
This way, even if you don’t directly ask them to fill out the form and get started, the option is always there. You can, of course, include a direct link to your client intake form within the email, if you prefer.
This option can be used regardless of which tool you use since all you need is a link to the form.
Make your life easier with a client intake form
Having real conversations with your clients is important—but chasing down details in scattered emails or sitting through calls with the wrong-fit leads? That’s time you don’t get back.
Without a streamlined client intake form, you’re more likely to:
-
Get stuck in endless back-and-forth just to gather basic info
-
Spend valuable time on calls that go nowhere
-
Delay projects waiting on files, passwords, or missing details
The more admin you take on, the less time you have to focus on the work that actually grows your business.
That’s why using a client intake form — especially one connected to your existing workflow in Copper — can make all the difference. You’ve already seen how Copper Forms help automate follow-ups, organize submissions, and kick off the right tasks without extra effort.
It’s not just about collecting information from clients. It’s about setting up a process that saves you time, keeps your team in sync, and gives every client a better experience from day one.
Ready to spend less time managing and more time doing?